In principle Dynamic Range describes the brightness range of the scene we are photographing. It also means Dynamic Range is the amount of visible detail that can be seen or recovered between the lightest part of a photograph and the darkest. A scene with high dynamic range will have large difference in brightness between the darkest zones and the brightest. Photographer’s mentions dynamic range related to scene’s contrast or tonal range, which means the same.

Camera manufactures also talk about Dynamic Range with regards to the camera sensor. In this case, it’s the ability of the sensor to record these very high brightness ranges. This means that cameras with a larger dynamic range are able to capture both highlight and shadow detail simultaneously. DSLR’s have a larger dynamic range than point and shoot cameras because their sensors have larger pixels. Also generally, a full frame sensor can provide a broader dynamic range and better low light/high ISO performance yielding a higher quality image than a crop sensor.
Dynamic range is measured as EV values or stops. The dynamic range of the scene and the dynamic range of your camera are two different things.
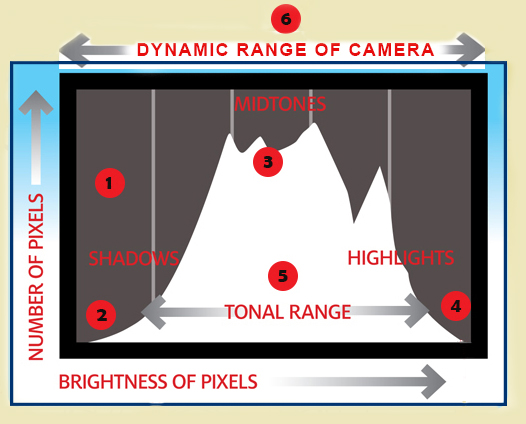
Let’s look at the illustration (above) and understand how to read the histogram in relation to dynamic range:
1. The histogram is a graphical representation of the tones in your picture, showing the number of pixels at different brightness level from pure black on the left to pure white on the right.
2. The ‘Shadows‘ in your picture are roughly the left quarter of the overall brightness range.
3. The histogram peaks in the Midtones with an average amount of shadow and highlights. The histogram shapes will vary depending on exposure.
4. The ‘Highlights’ are in the right quarter of the brightness range.
5. The dynamic range of the scene you are photographing is shown by the width of the histogram known as contrast range or the tonal range
6. The dynamic range of your camera can record, is shown but the width of the histogram scale. If the histogram won’t fit, it’s a warning sign.
Professionals always advice to shoot in RAW format, for a very simple reason a raw digital image shall have a wider dynamic range or color gamut than the eventual final image format, and it preserves most of the information of the captured image.
While we understand the importance and advantage of Dynamic range, we also need to understand few issues when using dynamic range and the likely solution to the same.
Issue 01 – Landscape
In landscape, the sky is often much brighter than the landscape itself and no single exposure can capture both.
Solution: Landscape photographers use graduated filters to block some light and bring the bright sky back into camera’s dynamic range.
Issue 02 – Sun & Shade High Contrast
Bright sun under clear sky can produce a difference between light and shade that’s just too large for the camera to cope with.
Solution: Shoot RAW, RAW files contains extra highlight and shadow detail that you can recover later in post processing
Issue 03 – Portraits faces in shadow
Backlighting will either leave your subject’s face in shadow or if you increase the exposure will make the background blown out.
Solution: Fill-flash to lighten your subject’s face and bring the scene back into camera’s dynamic range.
Issue 04 – Dawn and Dusk and in Extreme Contrast
At sunset and twilight the sky is often so much brighter than the rest of the scene that you can’t capture the full brightness range even with camera. Also in extreme contrast situation where you have a wide extraordinary range of contrast in a scene, a range far greater than any camera’s sensor can capture. A type of situation where you have enough shadow and highlight, the camera is going to have trouble capturing the ends of that drastic range. If you choose to meter for the highlights (the bright areas), you’ll lose pretty much all the detail in the shadow areas of the scene. Try it the other way—meter for the shadows—and it’s likely you’ll end up with what are commonly called “blown out” highlights.
Solution: Use HDR, shoot the scene in a series of different exposure commonly called Bracket to capture both shadows and highlight details and then use HDR software to merge them into one image

